
Welcome Friends

This tutorial was written by me on January 20, 2016 , using my own ideas.
Any resemblance to others is coincidental and accidental. This tutorial assumes
you have a working knowledge of psp and is written in PSPX6.
Supplies:
“Mouse In Teacup” tube by Alicia Bel – This tube was
purchased before The PSP Project closed and I am not sure where Ms. Bel is
selling tubes at now. If oyu don’t have this tube, please use a suitable
replacement
Scrap papers of choice to match tube_The ones I used are
from Bel Vidotti’s FTU scrap kit, “Soulmate”. However, Bel Vidotti’s kits are
no longer available. Again, use a suitable replacement.
Filters:
Eye Candy 4000_Gradient Glow
Penta.com_Color Dot
Xero_Fritillary
Fonts:
Nelson Script
Never
EC = Eye Candy
GG = Gradient Glow
DS = Drop Shadow
C/P = Copy and Paste
FF = Flood Fill
ANL = Add New Layer
AS = Animation Shop
When working with templates, always Shift+D to
duplicate, close original, then on each layer, select with magic wand (or
Select All, Float, De-float), ANL, close/delete the original, do steps required
in tutorial, select none
Image_Rotate Left
Starting at bottom of template:
Background Swirl_ #d7abe3_Noise 50
Sharpen
Stripe_C/P paste striped paper of choice (BV_paper12)
Magic Wand_Select the darker stripes_Add noise 50
Select none
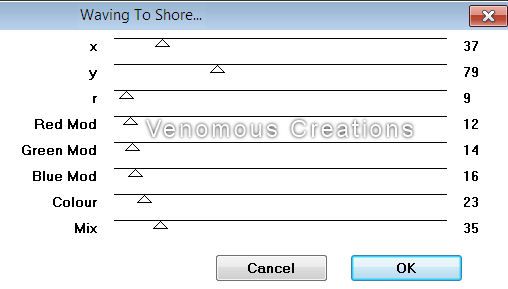
EC400_GG_3_25_100_#fd618e
Frame Fill_Grungy paper of choice (BV_paper04)
Shadow_Delete
Frame Trim_FF #e1013d
Frame_FF #fd618e
Effects_3D Effects_Inner Bevel:

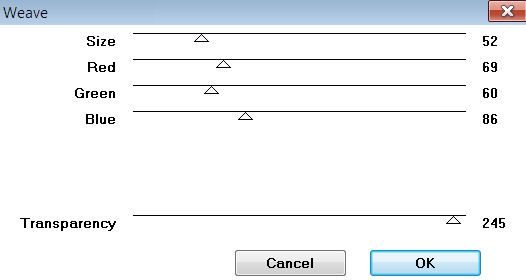
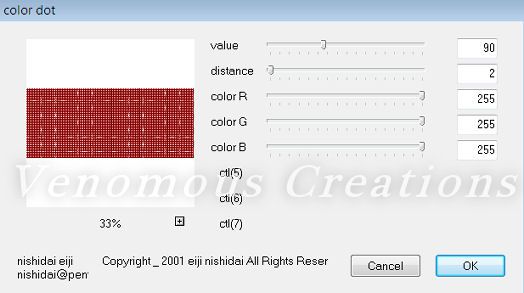
Penta.com_Color Dot_Default
Copy Merged
Paste As New Layer
Move to bottom
Adjust_Blur_Gaussian_15
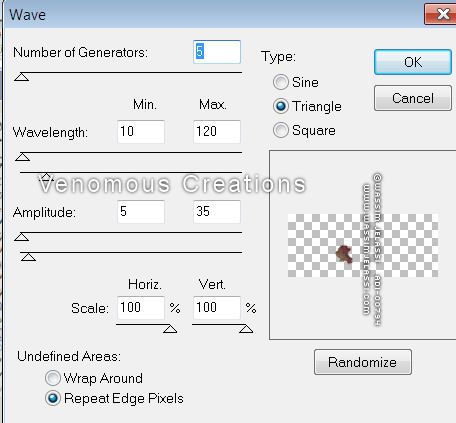
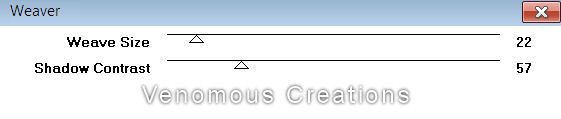
Xero_Fritiallary_5_30_10_10
Efffects_Edge Effects_Enhance
Opacity_70
Text Tool_Never_72_Black
Type out “Welcome Friends”
Place as shown
Convert to raster
C/P tube
DS_0_0_50_35_Black
Apply DS_0_0_100_10_Black to Frame
Apply DS_0_0_50_15_Black to Stripe and Swirl layers
Add all correct copyright/license information
Name_ Nelson Script_100_Black
DS_2_5_50_5_Black
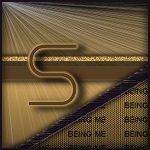
Save!!


