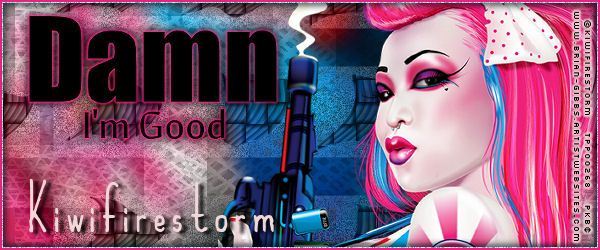
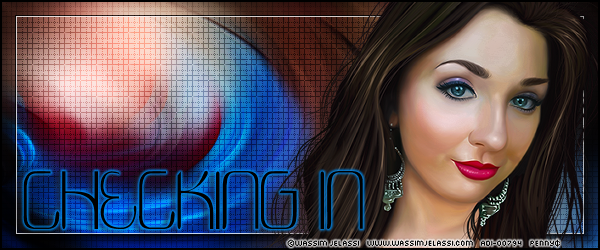
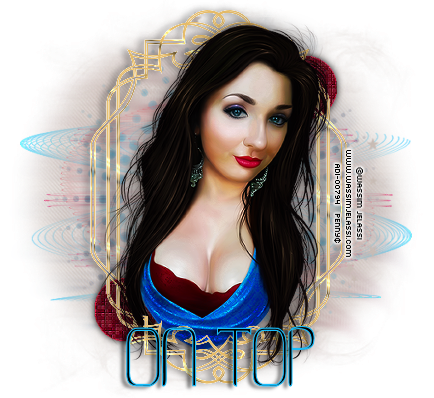
Swirling Stars
This tutorial was written by me on February 26, 2013, using my own ideas. Any resemblance to others is
coincidental and accidental. This tutorial assumes you have a working knowledge
of psp and is written in PSPX.
Please leave some love when downloading supplies. The
artists/creators work hard to make/share their work with us, so let's be
appreciative. Please use all correct copyright information and follow all
TOU’s. Let’s give credit where credit is due.
As always, tutorials are only a guideline. If you
don't have the exact supplies, use ones you have or ones you choose.
Supplies:
Template 24 by Babe’s
Designz - unfortantely, she has removed her blog so I cannot link to it
Dragonfly_Sinedots II
Xero_Radiance,
Fritillary, Titanium
Smudge Brush of
choice
Font_ Cosmonautica
Abbreviations:
EC = Eye Candy
GG = Gradient Glow
DS = Drop Shadow
C/P = Copy and Paste
FF = Flood Fill
ANL = Add New Layer
AS = Animation Shop
Found my Sinedots while digging thru my filter folder so thought I would have a play with it. There are so many possibilities with this filter, so please play around sometime with the settings and see what you create!!
This is kind of a
long tut, so get comfy and bare with me while I try not to skip anything, LOL.
Open
template_Shift+D_close original
Close/delete these
layers: Credits and Frame
Select Bars_ANL_FF #00a8e5_Select
None_
Xero_Titatium_Default
settings
Duplicate_Blur_5
Effects_Texture
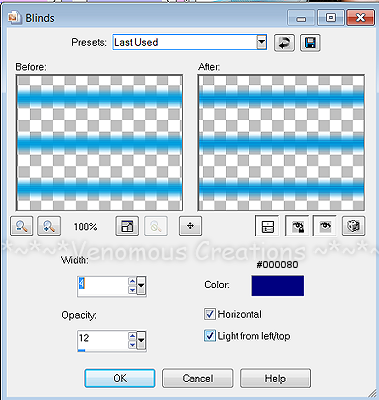
Effects_Blinds:
Close/delete original
bars
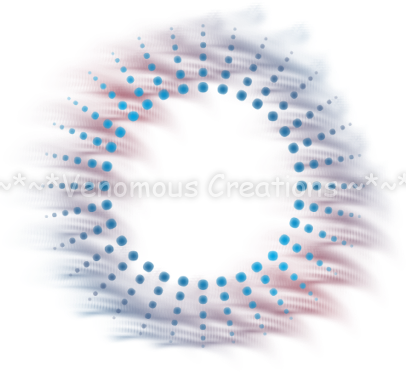
Select Circles
layer_Modify_Smooth_21_1_ANL_FF #73011a
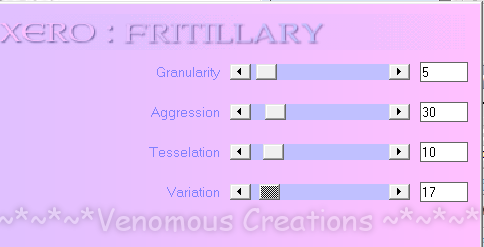
Xero_Fritillary:
Effects_Edge
Effects_Enhance_Twice
Choose 2 shades of
blue from your tube_Set Foreground to Foreground/Background Gradient_45_1_have
dark color in middle
Highlight “Masked
Layer”_ANL_FF with your gradient
Masked Layer_Select
All_Float_De-float
Highlight gradient
layer_Promote Selection To Layer_Select none
Close/delete masked
layer
Change colors to a
dark red and darker blue_Same Gradient settings
ANL above promoted
layer we just did
Using a grunge brush
of choice, hold down left mouse and drag in a circle covering the dots
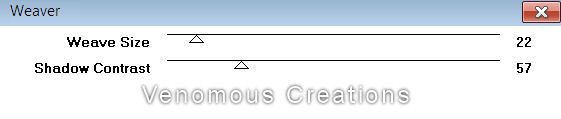
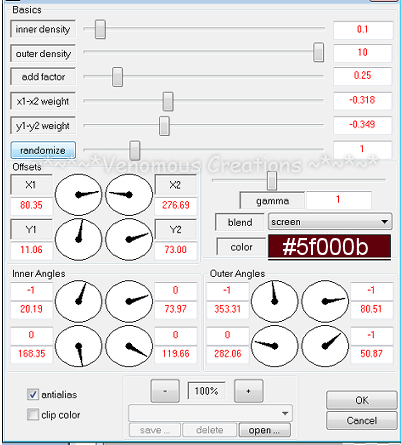
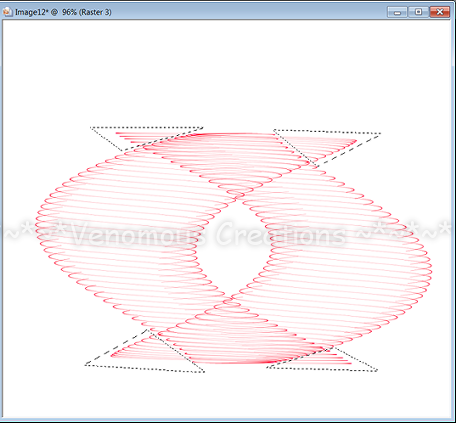
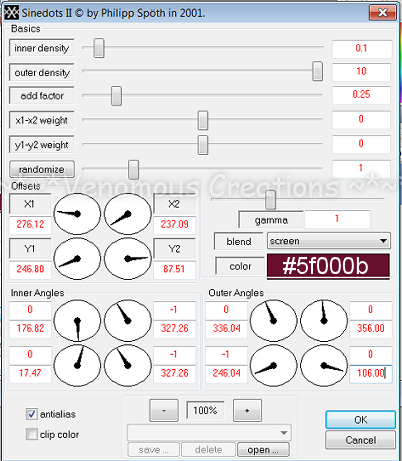
ANL_Dragonfly_Sinedots
II_Settings as shown:
Duplicate_Flip_Mirror_Place
as shown below_Merge
Select areas as shown
and delete:
Resize_85
Move just below
circles layer
Duplicate
ANL_Repeat Sinedots
changing the color to #00a8e5
Duplicate_Flip_Mirror_Place
as shown below_Merge
Select areas as shown
and delete:
Resize_85 until it is
slightly smaller than the red Sinedot layer
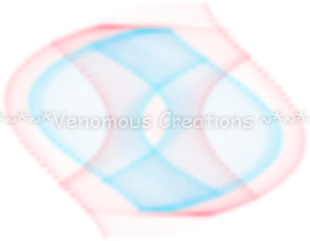
Merge with duplicate
red Sinedot layer_Blur 5
Should look like
this:
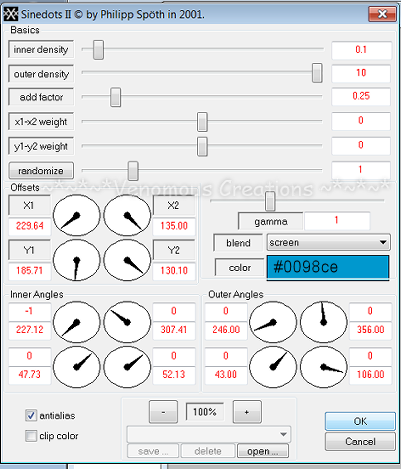
ANL_Sinedots
II_Settings as shown:
Resize_85_Lower
opacity to 53
Move below blue bars
ANL_Move to bottom_FF
#ccbeba
Duplicate
On original
layer_Apply mask
Highlight copy of FF
layer
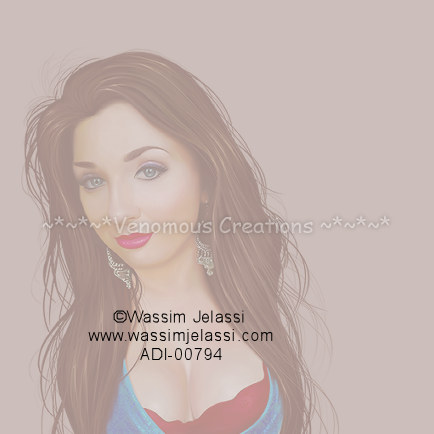
C/P tube_Mirror_Move
off center to the left like this:
Change Blend mode to
Soft Light
Merge with FF layer
Apply mask
Now, move this mask
layer up and to the left slightly so face is positioned as shown in sample tag
Erase parts of this
mask layer until only the face area is left making sure to keep the edges
softened so they blend with bottom mask
NL_SinedotsII:
Duplicate_Flip_Merge_Resize
85
Move right above the
blue bars_Change blend mode to Darken
Highlight top blue
bars_select all_float_de-float_Invert_Highlight Sinedot we just
made_Delete_Select none (should have dark lines in the blue bars)
C/P
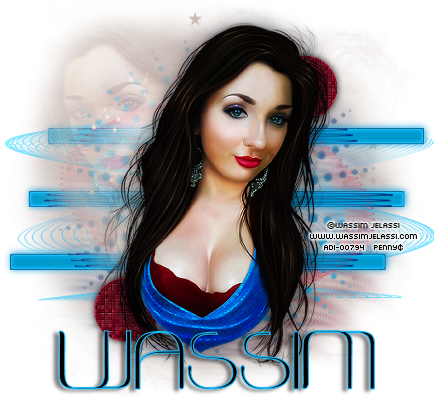
tube_Re-size_Place as shown in sample tag_Duplicate
On duplicate_Blur_3
Xero_Radiance_Default
Change blend mode to Soft
Light
Opacity at 71
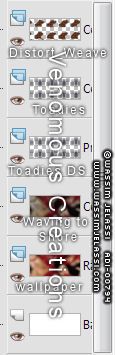
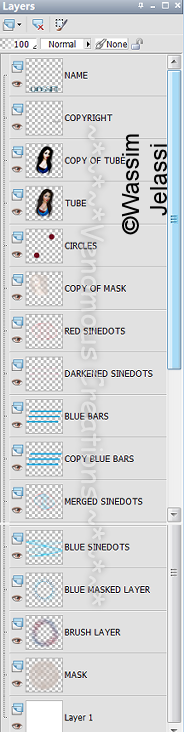
Make sure your layers
are arranged as shown in the palette:
Add all correct
copyright/license information
Add name_Cosmonautica_72_stroke
1 #19bdfb_fill Black
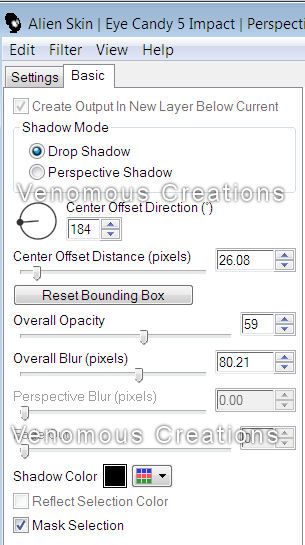
Let’s add some drop
shadows:
Original Tube:
0_0_50_30_Black
Circles_0_0_100_10
Name_2_-5_50_5_Black
Close/delete white
background layer
Save as png and
enjoy!!