Showing posts with label Kyra Wilson. Show all posts

Monday, September 5, 2016

No scraps - "Enhanced"


 Enhanced


This tutorial was written by me on September 04, 2016 using my own ideas.

Any resemblance to others is coincidental and accidental.

This tutorial assumes you have a working knowledge of psp and is written in PSPX6.


Supplies:

"Cool Cat" tube by Kyra Wilson_tube/license currently available at ADI


Filters:

Xero_Porcelain


Fonts:

Poopi Doopie


Abbreviations:

DS_Drop Shadow

ANL_Add New Layer

EC_Eye Candy

GG_Gradient Glow

AS_Animation Shop

C/P_Copy and Paste

FF_Flood Fill


This is a fast, easy tutorial, LOL.


Open blank 500x500 canvas


C/P tube

Duplicate twice


Bottom Tube_Blur_Motion Blur_245_100

Repeat blur

Duplicate

Image_Mirror

Effects_Edge Effects_Enhance twice

Repeat Enhance twice for other motion blur layer


Middle Tube_Adjust_Blur_Gaussian 10

Add Noise_Gaussian 25

Repeat noise


Top Tube_Sharpen More

Xero_Porcelain_50_128_128_0_0_255


Add all correct copyright/license information


Name_Poopie Doopie_48_#00cc0f

DS_0_0_100_10_Black


Save!!

Monday, March 30, 2015

No Scraps Forum - "The World"

The World


This tutorial was written by me on March 30, 2015, using my own ideas. Any resemblance to others is coincidental and accidental. This tutorial assumes you have a working knowledge of psp and is written in PSPX6.
Please leave some love when downloading supplies. The artists/creators work hard to make/share their work with us, so let's be appreciative. Please use all correct copyright information and follow all TOU’s. Let’s give credit where credit is due.
As always, tutorials are only a guideline. If you don't have the exact supplies, use ones you have or ones you choose.
Supplies: 
"Timmy" tube by Kyra Wilson - tube/license currently available at ADI
Word Art/Saying of choice
Filters:
VM Toolbox_Mezzontinto Uno
Transparency_Eliminate White
DC_Ghost
AB Filters 2000_Heated Exchange
Mehdi_Weaver
Xenofex 1_Baked Earth
DSB_Blast
Fonts:
Cricket
Abbreviations:
EC = Eye Candy
GG = Gradient Glow
DS = Drop Shadow
C/P = Copy and Paste
FF = Flood Fill
ANL = Add New Layer
AS = Animation Shop
Open blank 600x250 image
Gradient_#2d323b and #b3c1c5_Sunburst_1 repeat
FF image
Duplicate
VM Toolbox_Mezzontinto Uno_128_67_92_
Transparency_Eliminate White
Blend mode_Soft Light
Opacity_55
ANL
FF with gradient changing it to Linear
DC_Ghost_76_101
AB Filters 2000_Heated Exchange_22_9_92_20_221_9_212
ANL
FF with gradietn_Linear_angle 90_1 repeat_(dark color in center)
Effects_Distortion Effects_Pixelate_10_10
Effects- Edge Effects_Enhance
Mehdi_Weaver_50-150_110
Xenofex 1_Baked Earth_40_1_30_1_55_27_135_45
Move this layer below the Mezzontinto layer
Selection Tool_Rectangle_Select the 2 blue strips on top and bottom
Highlight Mezzontinto layer_Delete
Highlight Baked Earth Layer_Delete
Highlight the Blue Strips layer_Promote Selection to Layer
Select none
C/P tube
Re-size and place to the left below the strips layer
Duplicate
Highlight original tube layer
DSB_Blast_Right_40
Add Noise_30
Highlight top tube layer
DS_0_0_65_42_Black
Selection Tool_Select bottom blue strip
Promote To Layer
Effects_Distortion Effects_Wave_0_1_22_1_Repeat
Gaussian Blur_2
Move below Blast layer
C/P word art/saying of choice
DS_0_0_60_19_#e4b705
Opacity_75
ANL to top
FF Black
Select All_Contract 1_Delete_Select none
Add all correct copyright/license information
Name_Cricket_48_Black
Save!!

Thursday, January 8, 2015

No Scraps Forum - "Dragon Tales"


Dragon Tales


This tutorial was written by me on January 02,2015, using my own ideas. Any resemblance to others is coincidental and accidental. This tutorial assumes you have a working knowledge of psp and is written in PSPX6.
Please leave some love when downloading supplies. The artists/creators work hard to make/share their work with us, so let's be appreciative. Please use all correct copyright information and follow all TOU’s. Let’s give credit where credit is due.
As always, tutorials are only a guideline. If you don't have the exact supplies, use ones you have or ones you choose.


Supplies:
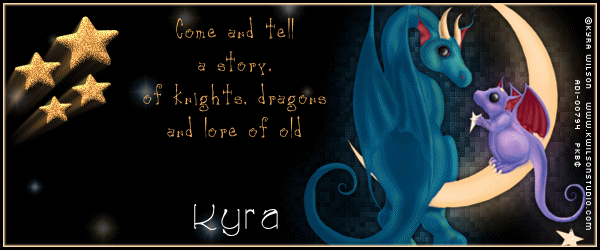
"Father's Day" tube by KyraWilson - tube/license available at ADI
Pre-set Shape_Star
Flare or Sparkle Picture tube (usually comes with psp)
Quote/Saying of choice
Animation Shop

Filters:
Xero_Fritillary
Eye Candy 4000_Motion Trail and Gradient Glow

Fonts:
Canker Sore
Cricket


Abbreviations:
EC = Eye Candy
GG = Gradient Glow
DS = Drop Shadow
C/P = Copy and Paste
FF = Flood Fill
ANL = Add New Layer
AS = Animation Shop


Open a blank 600x250 canvas
ANL_FF Black

ANL
Duplicate for 3 blank layers

Highlight top blank layer
Picture Tube Tool_Flare/Sparkle_Scale 65_Step 35_Random_Random
Click on image several times placing random Flares/Sparkles
Opacity_40

Highlight 2nd blank layer down
Repeat Picture Tube Tool_ Flare/Sparkle _Scale 55
Carefully place each new Flare/Sparkle in center of previous layers Flare/Sparkle
Opacity_40

Highlight 3rd blank layer down
Repeat Picture Tube Tool_ Flare/Sparkle _Scale 45
Carefully place each new Flare/Sparkle in center of previous layers Flare/Sparkle
Opacity_40

Close layers 2 and 3 for now

C/P tube
Re-size and place to the right
Duplicate
On original tube layer_Gaussian Blur_20
Xero_Fritillary_5_30_10_30
DS duplicate tube_0_0_100_10_Black

Pre-set Shape_Star_#f4ae5e
Draw a star in top left corner
Inner Bevel:


Duplicate for a total of 4 stars
Re-size each once or twice
Place as shown
Merge stars together
Noise_40
Duplicate
Highlight original star layer
EC 4000_Motion Trail:


Opacity 50

ANL to top
FF Black
Select All_Contract 3_Delete_Select None
EC 4000_GG_3_25_100_ #ffdcaf

Add saying of choice
Canker Sore_26_ #f4ae5e

Add all correct copyright/license information

Name_ Cricket_36_White

Animating:

Highlight top layer
Copy Merged
AS_Paste As New Animation

Back to PSP
Close 1st flare layer
Open 2nd flare layer
Copy Merged
AS_Paste After Current Frame

Back to PSP
Close 2nd flare layer
Open 3rd flare layer
Copy Merged
AS_Paste After Current Frame

Edit_Select All
Animation_Animation Properties_15

If happy with animation, save!!!


No Scraps - "Winter Fun"

Winter Fun


This tutorial was written by me on January 01,2015, using my own ideas. Any resemblance to others is coincidental and accidental. This tutorial assumes you have a working knowledge of psp and is written in PSPX6.
Please leave some love when downloading supplies. The artists/creators work hard to make/share their work with us, so let's be appreciative. Please use all correct copyright information and follow all TOU’s. Let’s give credit where credit is due.
As always, tutorials are only a guideline. If you don't have the exact supplies, use ones you have or ones you choose.


Supplies:

"Snowbird" tube by KyraWilson - tube/license available at ADI
Winter picture of choice - this is one I took of a tree in our yard  available HERE
Mask of choice - I used Mask022 by Becky
Word Art by me HERE
or below....click on image, then right click and save


Filters:
VDL Adrenaline_Snowflakes

Fonts:
PegsannaHMK


Abbreviations:
EC = Eye Candy
GG = Gradient Glow
DS = Drop Shadow
C/P = Copy and Paste
FF = Flood Fill
ANL = Add New Layer
AS = Animation Shop


Open photo in psp
Re-size to about 600x400
Convert background to layer
Apply mask

Open blank 600x600 canvas
C/P mask layer
Place slightly to the left side of canvas
Duplicate
On original_Art Media Effects_Brush Strokes:


On duplicate_Blend mode Dark Light

ANL to bottom of canvas_FF #504e5b
ANL above this layer_Select All
C/P original photo into selection
Blend Mode_Luminance (L)
Merge down
Selections_Feather_35
Selections_Invert
Hit delete a few times to soften the edges
VDL Adrenaline_Snowflakes:


Select none

C/P tube placing to the right
DS_0_0_100_10_Black
DS_22_22_50_10_Black

C.P word art
DS_0_0_100_10_White

Add all correct copyright/license information

Name_ PegsannaHMK_72_ #bed7da
DS_22_22_100_10_Black

Save!!!


No Scraps - "Friends"

Friends


This tutorial was written by me on January 01,2015, using my own ideas. Any resemblance to others is coincidental and accidental. This tutorial assumes you have a working knowledge of psp and is written in PSPX6.
Please leave some love when downloading supplies. The artists/creators work hard to make/share their work with us, so let's be appreciative. Please use all correct copyright information and follow all TOU’s. Let’s give credit where credit is due.
As always, tutorials are only a guideline. If you don't have the exact supplies, use ones you have or ones you choose.


Supplies:

"Mandy" tube by Kyra Wilson - tube/license available at ADI
Template 10 by Missy of Divine Intentionz
My word Art #32 HERE

Filters:
Eye Candy 5_Impact_Glass
Toadies_What Are You

Fonts:
Gardenia


Abbreviations:
EC = Eye Candy
GG = Gradient Glow
DS = Drop Shadow
C/P = Copy and Paste
FF = Flood Fill
ANL = Add New Layer


When working with templates, always Shift+D to duplicate, close original, then on each layer, select with magic wand (or Select All, Float, De-float), ANL, close/delete the original, do steps required in tutorial, select none


Make a gradient using #bed7da and #3c738d
Angle_45
Repeats_3

Background Frame_FF with gradient
Effects_Distortion_Pixelate_5_10
Edge Effects_Enhance
Select none

Frame_FF #791727
Add Noise_50
Select None

Thin Rectangle_FF #2b485e
Texture Effects_Weave_2_9_1_Both boxes #0686b1_Fill Gaps Checked

Medium Heart_FF #791727
EC 5_Impact_Glass_Clear No DropShadow_Default

Merge Small Heart 1 and 2 together
FF #f17c91
Repeat EC 5 Glass

Large Heart_FF #791727
Duplicate
Texture Effects_Fine Leather:


Repeat EC 5 Glass
Select none

Close bottom white layer
Copy Merged
Paste As New Layer
Move to bottom of palette, matching the edges of the layers
Effects_Toadies_What Are You_20_20
Noise_50

Duplicate
On original_Repeat Toadies_What Are You

C/P tube placing as shown
Duplicate
On Original_Gaussian Blur_20
Art Media_Brush Strokes:


Edge Effects_Enhance twice

On Duplicate tube, Hearts, Frame, Thin Rectangle_DS_0_0_100_20_Black

Add Word Art
DS_0_0_100_10_White

Add all correct copyright/license information

Name_Gardenia_72_Black
Repeat White DS

Save!!