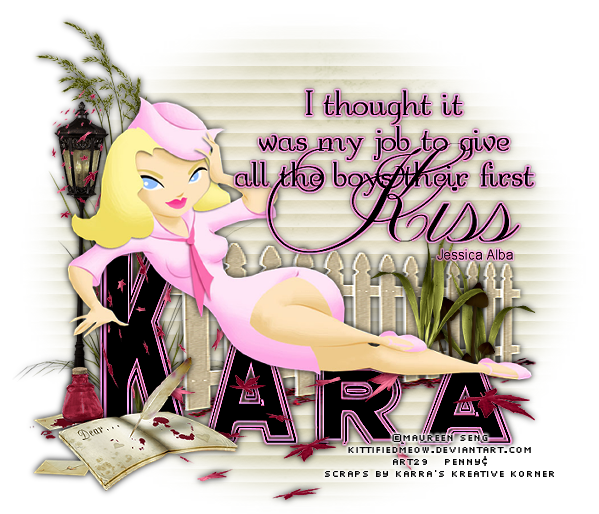
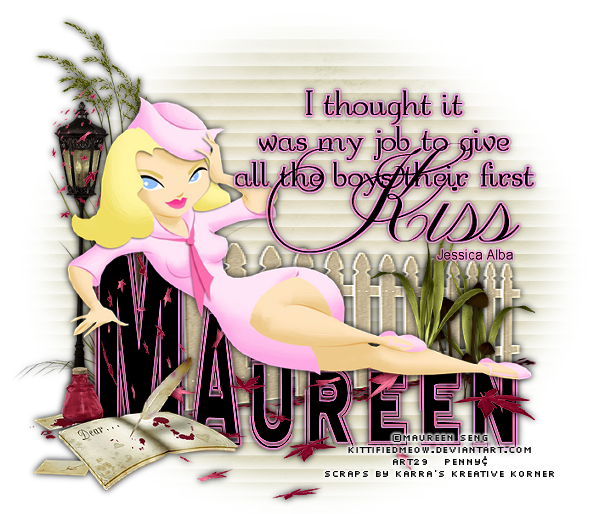
Showing posts with label Karra's Kreative Korner. Show all posts

Friday, September 7, 2012

PTU - "First Kiss"


First Kiss


 This tutorial was written by me on September 07, 2012, using my own ideas. Any resemblance to others is coincidental and accidental. This tutorial assumes you have a working knowledge of psp and is written in PSPX.
Please leave some love when downloading supplies. The artists/creators work hard to make/share their work with us, so let's be appreciative. Please use all correct copyright information and follow all TOU’s. Let’s give credit where credit is due.
As always, tutorials are only a guideline. If you don't have the exact supplies, use ones you have or ones you choose.


Supplies:

“For The Boys” tube by Maureen Seng available at ART
“Memories Of Fall” by Karra’s Kreative  Korner available at ART
Monti Blind Mask
Eye Candy 4000 – Gradient Glow
Font_Washing Machine


Abbreviations:
EC = Eye Candy
GG = Gradient Glow
DS = Drop Shadow
C/P = Copy and Paste
FF = Flood Fill


Open blank 600x600 canvas
Add new layer – select all
C/P paper 3 into selection – select none
Apply mask
C/P tube
C/P the following elements:
Fence
Grass
Leaves 2
Letter
Light
Mushrooms
Weeds
C/P word art
EC 4000_GG_3_25_100_#fb6caa
Add all correct copyright/license information
Add name_Washing Machine_100_Black – do not convert
Objects_Convert Text To Curves_As Character Shapes
Click the “+” sign beside name in the layer palette – click on the second “+” – Go to the first letter of name – using nodes, stretch to fit under shoulder of tube
Repeat for second and third letters, shaping them to the body of the tube
Convert to raster – move below the tube
Repeat GG - Sharpen more
DS word art_0_0_50_10_Black
DS all other layers_0_0_100_10_Black
Save!!


Thursday, June 7, 2012

PTU - Bee Happy


Bee Happy


This tutorial was written by me on June 07, 2012, using my own ideas. Any resemblance to others is coincidental and accidental. This tutorial assumes you have a working knowledge of psp and is written in PSPX.
Please leave some love when downloading supplies. The artists/creators work hard to make/share their work with us, so let's be appreciative. Please use all correct copyright information and follow all TOU’s. Let’s give credit where credit is due.
As always, tutorials are only a guideline. If you don't have the exact supplies, use ones you have or ones you choose.


Supplies:

Summer Buzz” PTU scrap kit by the awesome Karra’s Kreative Korner and is available at ArtisticReality Talent
Fonts – PC Roundabout (Happy) and Pen Tweaks One SSI (Bee and name)
Eye Candy 4000 – Gradient Glow
Mask – Edge Squares which came with PSPX

To save time, I use these abbreviations:
C/P = copy and paste
DS = drop shadow
FF = Flood Fill


In psp, open a new blank image 600x250
Add a new layer
Select all
Open paper 6 in psp, C/P into selection
Select none
Layers – Load/Save Mask – Load Mask From Disc_Find the Edge Mask and hit Load
Merge – Merge Group
Adjust – Add/Remove noise – Add Noise_Uniform_15_Monochrome
Effects – Texture Effects – Weave_3_13_1_White_White_Fill Gaps
Font – PC Roundabout_Background #59320f_Foreground null_72
Type out “Happy”
Convert to raster
Eye Candy 400 _ Gradient Glow_3_25_100_#8aae3a
Font – Pen Tweaks One SSI _ Background #8aae3a_Foreground null_72
Type out “Bee”
Using nodes, twist slightly to angle it
Place at top left of Happy
Convert to raster
Repeat Gradient Glow changing the color to #fcc537
Now add any elements you like – I added the following, resizing, duplicating, sharpen, and placing to my liking:

KK_bee3
KK_bees
KK_sparkles
KK_flower1
KK_flower2

Add all correct copyright information
Add your name using Pen Tweaks_120_#fcc537
Repeat Gradient Glow changing color to #8aae3a
Resize, sharpen, and place
I made it large so that when I added the Gradient Glow it would be on the small, thin lines. Otherwise the glow will skip thin areas and not look so good.
D/S all Elements_0_0_100_5_Black
D/S words_2_-5_50_5_Black
Save and enjoy!!


Here's another version of same tut...


Sunday, May 20, 2012

PTU - Rustic Hunter


Rustic Hunter


This tutorial was written by me on May 20, 2012, using my own ideas. Any resemblance to others is coincidental and accidental. This tutorial assumes you have a working knowledge of psp and is written in PSPX.
Please leave some love when downloading supplies. The artists/creators work hard to make/share their work with us, so let's be appreciative. Please use all correct copyright information and follow all TOU’s. Let’s give credit where credit is due.
As always, tutorials are only a guideline. If you don't have the exact supplies, use ones you have or ones you choose.


Supplies:

Tube of choice – I am using an awesome tube by The Hunter available at his store HERE – please do not use this same tube without the proper license
Rustiq Luv” PTU scrap kit by the talented Karra's Kreative Korner –  this great kit is available at  Artistic Reality Talent
Mask of choice – I am using Becky_Mask023
Font of choice – Mine is “2 Deco Roman DNA”
Optional: Eye Candy 4000 – Gradient Glow


To save time, I use the following abbreviations:
C/P = copy/paste
DS = drop shadow


Open a new blank image 650x600 in psp
Add a new layer
Selections – Select All
C/P paper 10 into selection
Select none
Open mask in psp
Layers – New Mask Layer – From Image – choose your mask from dropdown list
Right click mask layer in palette – Merge – Merge Group
C/P heartswirl2 as new layer and place in position
C/P sparkles as new layer and position – see my tag for reference
C/P rope heart and move slightly up and to the left of image
Using magic wand, click inside heart
Selections – Modify – Expand_4
Add a new layer below frame
C/P into selection paper 8
C/P as new layer tube close up
Position where you want
In layer palette, right click on close up and promote selection to layer
Select none
Change the blend mode of tube layer to Multiply
Add elements –
     Flower 4
Bench
 Scatter
    Butterfly
Placing them to your liking
C/P main tube as a new layer and position to right of tag slightly covering half of heart
DS all layers – Effects – Drop Shadow_2_-5_50_5_Black
Add all correct copyright information
Add your name in font of choice – I used 2 Deco Roman DNA_72_Black
Effects - Eye Candy 4000 – Gradient Glow_3_25_100_#4adcd8
Adjust – Sharpen – Sharpen More
DS name
Save and that’s it!!