Showing posts with label Alex. Show all posts

Sunday, January 8, 2017

No Scraps "BFF's"

BFF's


This tutorial was written by me on January 08, 2017 using my own ideas.

Any resemblance to others is coincidental and accidental.

This tutorial assumes you have a working knowledge of psp and is written in PSPX6.


Supplies:

"Alex-040" tube by Alex - tube/license currently available at ADI

"Best Friends" word art by Daira for Creative Misfits Creations


Filters:

Toadies_What Are You

Fonts:

GE Offshore Caps


Abbreviations:

DS_Drop Shadow

ANL_Add New Layer

EC_Eye Candy

GG_Gradient Glow

AS_Animation Shop

C/P_Copy and Paste

FF_Flood Fill


When working with templates, always Shift+D to duplicate, close original,

then on each layer, select with magic wand (or Select All, Float, De-float), ANL,

close/delete the original, do steps required in tutorial, select none


Starting at bottom of template:


Copy of Raster 3_FF #96b972

Raster 6_FF #73a3bc

Effects_Texture Effects_Blinds_4_10_Black_Horizantal box unchecked

Copy of Raster 6_Repeat above steps

Raster 4_FF #d2e8bf

Adjust_Add Noise_Random_10

Copy of Raster 4_FF #995e7d

Effects_Texture Effects_Weave_2_12_1_Both Boxes #d4b7c5_Fill Gaps Checked

Raster 3_Repeat steps for Copy of Raster 3

Raster 1_Select the top and bottom side rectangles and the middle square

FF#62071b

Now select the top and bottom strips, plus the middle side rectangles

Adjust_Add Noise_Uniform_50

Raster 2_Select the Gray inside area

FF #c2b9a3

Effects_Texture Effects_Fine Leather_#dcdcdc_235_4_255_94_3

Raster 2_Select the White ring

FF #7da758

Raster 5_FF #e5e0d2

Copy of Raster 5_FF #e5e0d2

Merged_Delete

Vector_Delete

Copy Merged

Paste As New Layer

Line it up with the original layers

Move to bottom of tag

Effects_Toadies_What Are You_20_20

Repeat What Are You

Effects_Texture 
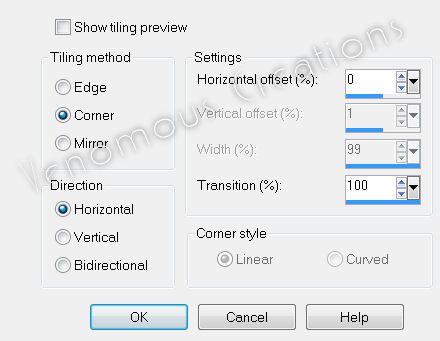
Effects_Blinds_Same settings as before but check the Horizontal box

Repeat Blinds again

DS each template layer_0_0_75_15_Black

C/P tube

DS_0_0_75_35_Black

C/P Word Art

EC 4000_GG_3_25_100_#d2e8bf

DS_0_0_75_15_Black

Add all correct copyright/license information

Name_GE Offshore Caps_48_Black

Save!!!


Thursday, October 6, 2016

No Scraps Animated Forum "Say Cheese"


Say Cheese


This tutorial was written by me on Ocotober 06, 2016 using my own ideas.

Any resemblance to others is coincidental and accidental.

This tutorial assumes you have a working knowledge of psp and is written in PSPX6.


Supplies:

"Alex-033" tube by Alex - tube/license currently available at ADI


Word Art/Saying of choice


Filters:

Mura's Meister_Copies

Brush Strokes_Sprayed Strokes

VM Instant Art_Vernissage

Penta.com_Dot and Cross

Eye Candy 4000_Gradient Glow


Fonts:

AR HERMANN

Segoe Print


Abbreviations:

DS_Drop Shadow

ANL_Add New Layer

EC_Eye Candy

GG_Gradient Glow

AS_Animation Shop

C/P_Copy and Paste

FF_Flood Fill


Open blank 600x250 canvas

C/P tube

Mura's Meister_Copies_Wallpaper Rotate_Default

Adjust_Blur_Motion Blur_264_100

Repeat blur 4 times

Crop to 600x250

Effects_Brush Strokes_Sprayed Strokes_12_7_Right Diag.

Duplicate

VM Instant Art_Vernissage_134_99_142_66

Magic Wand_Select the White area

Delete

Select none

Blend Mode_Multiply

Adjust_Add Noise_Gaussian 55

Duplicate

Highlight original Vernissage layer

Adjust_Blur_Gaussia 10

Penta.com_Dot and Cross_72_10_2

Repeat 3 times

Selection Tool_Custom Selection:

Top: 178

Left: 0

Right: 600

Bottom: 228

ANL_FF Selection Black

Select none

Opacity_50

C/P tube

DS_0_0_65_25_Black

Add Word Art/Saying of choice (I typed "Say Cheese" using the font AR HERMANN)

EC 4000_GG_3_25_100_#e12b36

Adjust_Sharpen More

Duplicate

Highlight original wording layer

Adjust_Blur_Radial Blur_Zoom_30_0_0_0

Adjust_Sharpen More 4 times

Highlight wording copy

Blend Mode_Luminance (L)

ANL

FF Black

Select All_Contract 2

FF #e12b36

Contract 1

FF Black

Contract 2

Delete_Select none

DS_0_0_100_10_Black

Add all correct copyright/license information

Name_ Segoe Print_36_#e12b36

Move between tube and Black strip


Animating:

In AS_Open Simone_Camera Flash animation

Select All

In PSP_Copy Merged

AS_Paste As New Animation

Duplicate until you have 6 frames

Select All

Copy animation

Click on top of tag frames

Paste Into Selected Frame

Position and click

In PSP

Copy Merged

AS

Highlight last frame

Paste After Selected Frame (you should now have 7 frames)

Animation_Frame Properties_100

View Animation

If happy, Save!

(Note: I did not like the rapid flashing, so I deleted frames 2-6, making my tag have only 2 frames...1 with the flash and 1 without)


Saturday, January 9, 2016

No Scraps - "Best Friends"

Best Friends


This tutorial was written by me on January 09, 2016, using my own ideas. Any resemblance to others is coincidental and accidental. This tutorial assumes you have a working knowledge of psp and is written in PSPX6.


Supplies:
Principe” tube by Alex_tube/license available at ADI
Word Art/Saying of choice
 
Filters:
Mura’s Meister_Copies
 
Fonts:
CheckFontMedExt
 
 
Abbreviations:
EC = Eye Candy
GG = Gradient Glow
DS = Drop Shadow
C/P = Copy and Paste
FF = Flood Fill
ANL = Add New Layer
AS = Animation Shop


When working with templates, always Shift+D to duplicate, close original, then on each layer, select with magic wand (or Select All, Float, De-float), ANL, close/delete the original, do steps required in tutorial, select none
 
 
Starting at bottom
C/P tube
Mura’s Meister_Copies_Encircle_Default
Adjust_Blur_Gaussian_10
Apply mask
Move up and to the right slightly as shown
 
Text Tool_BrodyD_20_Black
Type out “Best Friends”
Convert to raster
Mura’s Meister_Copies_Tiling_Default but change Tile Gap to 2
Apply mask to this layer
 
Rectangle 1_FF #ecddee
Adjust_Add Noise_Uniform 15
 
Rectangle 2_FF #90829f
Effects_Texture Effects_Blinds_11_25_Black_Light From Top/Left Checked          
 
Rectangle 3_FF #d02a4d
Effects_Texture Effects_Fine Leather_#808080_210_5_255_18_10
Repeat Fine Leather
 
Circle_FF #58012d
Duplicate
Effects_Illumination Effects_Sunburst:
Color: White
Light Spot_0_50_51
Rays_43_80
Circles_23
Opacity_45
 
Circle Stitching_Select All_Float_De-Float
Highlight bottom White layer
Promote Selection To Layer
Select None
Move this layer to top
 
C/P tube placing as shown
DS_0_0_45_34_Black
 
DS each template layer (NOT the circle duplicate)_0_0_100_10_Black
 
Apply Word Art/Saying of choice
 
Add all correct copyright/license information
 
Name_CheckFontMedExt_36_White
 
Save as png and enjoy!!


Thursday, May 7, 2015

No Scraps - "Dance"

Dance


 This tutorial was written by me on May 06, 2015, using my own ideas. Any resemblance to others is coincidental and accidental. This tutorial assumes you have a working knowledge of psp and is written in PSPX6.
 
Supplies:
"Ballet" tube by Alex - tube/license currently available at ADI
Word Art/Saying of choice
 
Filters:
Mura's Meister_Copies_Wallpaper Rotate
Penta.com_VTR2
VM Natural_Splash
Xero_Fritillary
 
Fonts:
Helena


Abbreviations:
EC = Eye Candy
GG = Gradient Glow
DS = Drop Shadow
C/P = Copy and Paste
FF = Flood Fill
ANL = Add New Layer
AS = Animation


Open blank 600x600 image
 
C/P tube
Effects_PlugIns_Mura's Meister_Copies_Wallpaper Rotate_Default
Adjust_Blur_Radial Blur:


Duplicate
Effects_PlugIns_Penta.com_VTR2:


Effects_PlugIns_VM Natural_Splash:


Image_Flip
Blend Mode_Multiply
 
Merge Down
 
Open mask in psp
 
Layers_New Mask Layer_From Image_Click drop down and choose "gemsmasks-127
Merge Group
Adjust_Add/Remove Noise_Add Noise:


Close original mask image
 
C/P tube
place to the left as shown
Blend Mode_Screen
 
Highlight the very bottom layer (should be either blank or white)
FF this layer Black (we can see what we're about to do much better)
Grab the Eraser Tool
Erase parts of the tube that you don't want in the tag (any showing on outside of mask)
 
Before erasing:


After erasing


Now either FF the bottom layer white again or close it
 
C/P tube placing to the right as shown
 
Using the Selection Tool, select the flat end of the guys leg


Selections_Modify_Feather_35
Click Delete 2 or 3 times to soften the edge
Selections_Select None
 
Duplicate
Highlight original tube layer
Adjust_Blur_Gaussian Blur_10
Xero_Fritillary:


Re-Size 111%:


Highlight top tube
DS:


C/P the Word Art or type your saying of choice
 
Add all correct copyright/license information
 
Text Tool_ Helena_size 72_Foreground null_Background Black_Type your name
Repeat DS using same settings as before but change color to_#df1853
 
Close bottom background layer if you have one
If happy with tag, save as png!!

Saturday, April 18, 2015

FTU - "The Garden"

The Garden


This tutorial was written by me on April 18 2015, using my own ideas. Any resemblance to others is coincidental and accidental. This tutorial assumes you have a working knowledge of psp and is written in PSPX6.


Supplies:
"Alex-2013NRO33" tube by Alex - tube/license currently available at ADI
"Rose" FTU scrap kit by Mago74
Word Art/Saying of choice
 
Fonts:
Satisfaction


 Abbreviations:
EC = Eye Candy
GG = Gradient Glow
DS = Drop Shadow
C/P = Copy and Paste
FF = Flood Fill
ANL = Add New Layer
AS = Animation Shop


Open blank 600x600 image
 
ANL
Select All
C/P paper 6 into selection
Select none
Apply mask
 
C/P frame 9
Select inside with magic wand
Expand 5
ANL below frame
C/P paper 5 into selection
Select none
 
C/P Tube above frame
 
C/P the following elements, duplicating, mirroring, placing as shown:
34
36
40
41
43
48
59
68
70
71
 
DS tube_0_0_75_25_Black
 
DS all elements and frame_0_0_50_15_Black
 
Add Word Art/Saying of choice
 
Add all correct copyright/license information
 
Name _ Satisfaction_72_Black
 
Save!!

Friday, May 9, 2014

No Scraps Forum - Friends

Expression


This tutorial was written by me on May 09,2014, using my own ideas. Any resemblance to others is coincidental and accidental. This tutorial assumes you have a working knowledge of psp and is written in PSPX.
Please leave some love when downloading supplies. The artists/creators work hard to make/share their work with us, so let's be appreciative. Please use all correct copyright information and follow all TOU’s. Let’s give credit where credit is due.
As always, tutorials are only a guideline. If you don't have the exact supplies, use ones you have or ones you choose.


Supplies:

“Amigas” tube by Alex - tube/license available at ADI
2 masks of choice (these 2 are BlueDreamSlats and Beryl0008 which I do not know the creators of)
Eye Candy 5_Impact_Perspective Shadow
Eye Candy 4000_Gradient Glow
Quote of choice
Font_ Rankle (saying) and Rammstein (name)


Abbreviations:
EC = Eye Candy
GG = Gradient Glow
DS = Drop Shadow
C/P = Copy and Paste
FF = Flood Fill
ANL = Add New Layer
AS = Animation Shop


Open blank 600x250 canvas

Make a gradient with #7e9e32 and #640000_Linear_0_0_Green on top 

ANL_FF#640000_Noise_Gassian 50

ANL_FF with gradient_apply first mask (BlueDreamSlats)_Texture Effects_Fine Leather_White_210_5_255_18_10

C/P tube_re-size and place as shown
EC5_Perspective Shadow_Drop Shadow_180_29_60_82.89_Balck_Mask Selection

ANL_FF with gradient changing the green to #ffd49d putting the light color on bottom
Apply second mask (Beryl0008) Invert mask so only the frame outline shows
Convert to raster
DS_0_0_50_10_Black
Repeat 3 times

Add quote/saying of choice_ Rankle_24_ #ffd49d

Add all correct copyright/license information

Name_ Rechtman-Script_72
DS_2_5_50_5_Black

Save!!

Avatar

Open blank 150x150 canvas

Drag the background and first mask layers to new canvas

ANL_FF with last gradient
Apply second mask
Repeat invert and DS

Add first letter of name
Repeat DS for name

Save!!


Tuesday, November 19, 2013

No Scraps Forum Set - Girly Girl

Girly Girl


This tutorial was written by me on November 19, 2013, using my own ideas. Any resemblance to others is coincidental and accidental. This tutorial assumes you have a working knowledge of psp and is written in PSPX.
Please leave some love when downloading supplies. The artists/creators work hard to make/share their work with us, so let's be appreciative. Please use all correct copyright/license information and follow all TOU’s. Let’s give credit where credit is due.
As always, tutorials are only a guideline. If you don't have the exact supplies, use ones you have or ones you choose.


Supplies:

"2013nro33" tube by Alex - tube/license available at ADI
Flower element of choice
Filters:
Eye Candy 4000_Swirl, Gradient Glow, and Glass
Toadies_Weaver
 VM Natural_Sparkle
Eye Candy 5_Impact_Perspective Shadow
Font_GE Offshore Caps


Abbreviations:
EC = Eye Candy
GG = Gradient Glow
DS = Drop Shadow
C/P = Copy and Paste
FF = Flood Fill
ANL = Add New Layer
 AS = Animation Shop


Open blank 600x250 canvas

Choose a dark and a light color from tube
I used_ #8a1050 and #dd8ab9
Make a gradient with these colors

ANL
FF with gradient_Linear_angle 45_repeats 5

Effects_Distortion Effects_Pixelate_both boxes 10
Edge Effects_Enhance

Magic Wand_select the light diagonal strips
Add Noise_Uniform_25
Select none
Image Effects_Seamless Tiling:


Custom Selection:


ANL
FF #dd8ab9
EC 4000_Swirl:


Select none
Blend Mode_Multiply
EC 4000_GG_3_25_100_#8a1050
 DS_0_0_100_10_Black

ANL
Custom Selection:


Highlight background layer
Promote Selection To Layer
Select none
Free rotate_right_45
Duplicate twice
Place as shown


Merge diamonds together

Duplicate

On original:
Toadies_Weaver_Default
Add noise_20

On duplicate:
EC 4000_Glass:


DS_2_10_50_10_Black

C/P flower element of choice
Re-size so it fits nicely in center of first diamond
Duplicate twice
Place one in center of each diamond
Merge flowers together
VM Natural_Sparkle:


Blend mode_Soft Light
Merge with diamond layer

C/P tube
Place as shown
EC 5_Impact_Perspective Shadow:


ANL to top
FF Black
Contract_3_Delete
Select all

ANL
FF #8a1050
Select all
Contract_3_Delete
Add Noise_50
Select none

Highlight black frame layer_Blur_Gaussian_5

Add all correct copyright/license information

Name_ GE Offshore Caps_72_#cc679a
Duplicate
Convert top text to raster
Add noise_50

Highlight bottom text
Select with text tool
Change color to Black
Using arrows, click the right arrow 5 times and the down arrow 4 times
(black text layer should be moving…if not, close pink text layer, click on black text with mover tool, then click the arrows…open pink text)
DS Black text_2_5_50_5_Black

Save!!

AVATAR:Open blank 150x150 canvas
Select one of the diamonds with selection tool
C/P as new layer
Re-size 85% twice
Add all correct copyright/license information if needed
Add first letter of name
Repeat steps as for sig tag
Save!!