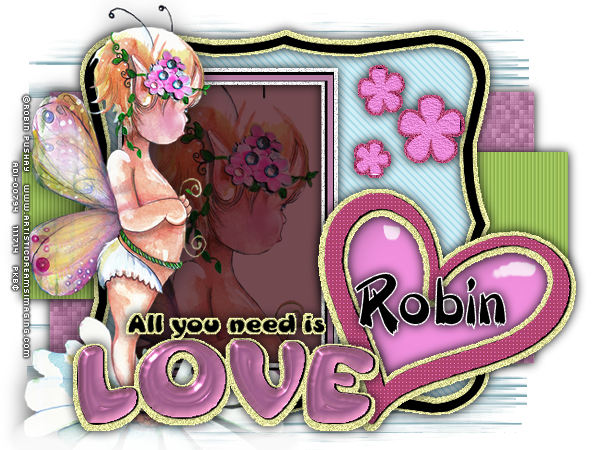
Showing posts with label Robin Pushay. Show all posts

Friday, February 3, 2017

No Scraps "Love You"

Love You


This tutorial was written by me on January 20, 2017 using my own ideas.

Any resemblance to others is coincidental and accidental.

This tutorial assumes you have a working knowledge of psp and is written in PSPX6.


Supplies:

"Cupid and Val" tube by Robin Pushay - tube/license currently available at ADI


My Word Art below or wording of your choice


Click image, then right click and save the full size png
 

Filters:

Mura's Meister_Copies


Fonts:

Back to Black Demo


Abbreviations:

DS_Drop Shadow

ANL_Add New Layer

EC_Eye Candy

GG_Gradient Glow

AS_Animation Shop

C/P_Copy and Paste

FF_Flood Fill


Open blank 600x600 canvas

C/P tube

Adjust_Blur_Gaussian 25

Mura's Meister_Copies_Wallpaper (shrink)_Default

Crop to 600x600

Apply mask

Text tool_font of choice_type wording ( I typed "LOVE")

Center in Canvas

Convert to raster

Mura's Meister_Copies_Tiling_Default but change Gap Size to 5

Apply mask again

C/P tube

Duplicate

On original_Adjust_Blur_Motion Blaur_218_60

Adjust_Add Noise_Gaussian 50

Highlight top tube

DS_0_0_75_10_Black

C/P Word Art or add your own wording

Change color to #fdd1ae

Place on the heart as shown

Add all correct copyright/license informtaion

Name_Back to Black Demo_72_stroke 1 #c22b7a_fill Black

Sharpen More

DS_2_-5_50_5_Black

Save!!!


Thursday, December 1, 2016

No Scraps Forum "Christmas Wishes"

Christmas Wishes


This tutorial was written by me on December 01, 2016 using my own ideas.

Any resemblance to others is coincidental and accidental.

This tutorial assumes you have a working knowledge of psp and is written in PSPX6.


Supplies:

"Elf Santa" tube by Robin Pushay - tube/license currently available at ADI

Forum Masks 16 and 21 from Moonbeam and Spiderwebs

Snow animation of choice

Gold Gradient of choice


Filters:

Funhouse_Patchwork

Mehdi_Weaver

Xero_Fritillary


Fonts:

KBJellyBean

CrazyCrazy


Abbreviations:

DS_Drop Shadow

ANL_Add New Layer

EC_Eye Candy

GG_Gradient Glow

AS_Animation Shop

C/P_Copy and Paste

FF_Flood Fill


Open blank 600x250 canvas

ANL_FF#610828

ANL_FF with Gold Gradient_angle 0_repeats 0

Apply Mask 21

ANL_FF #36000e

Apply Mask 21 again

Blend Mode_Overlay

Highlight original mask layer

Adjust_Add Noise_Uniform 44

C/P tube

Place to the far right

Duplicate

On original tube layer_Adjust_Blur_Motion Blur_270_100

Repeat twice more

Duplicate_Mirror_Flip_Merge Down to the original motion blur layer

Funhouse_Patchwork_15

Mehdi_Weaver_150-300_170

Effects_Edge Effects_Enhance

Apply Mask 16

Xero_Fritillary_5_30_10_10

Add Noise_Random_20

Blend Mode_Luminance (L)

Rectangle Pre-Set Shape Tool_stroke 0_fill #610828

Draw a fairly wide rectangle across width of tag, slightly down from center, and going past edges of canvas

Convert to raster

Effects_Distortion Effects_Wave:

Amplitudes: 0 and 5

Wavelengths: 5 and 35

Repeat Checked

Select All_Float_De-Float

Selections_Modify_Select Selection Borders_Both Sides_2

ANL_FF selection with the Gold gradient

Add Noise_Uniform 44

DS_0_0_100_5_Black

Text Tool_KBJellyBean_60_#36000e

Type "CHRISTMAS WISHES"

Use nodes to adjust it to fit canvas

Convert to raster

Effects_Distortion Effects_Wave:

Amplitudes: 0 and 5

Wavelengths: 5 and 35

Repeat Checked

Place wording in solid wave area


Highlight top tube

Adjust_Sharpen

DS_10_10_35_15_Black

ANL to top of canvas

Select All

FF #36000e

Contract 2

FF Gold gradient

Contact 1

Delete

FF #36000e

Contract 2

Delete

Select none

Sharpen More

DS_0_0_100_10_Black

Crop to 600x250

Add all correct copyright/license information

Name_CrazyCrazy _28_#f5dfe5


ANIMATING


Close all layers EXCEPT masks and background

Copy Merged

AS
Paste As NEw Animation

CTRL+L until you have the same number of frames as your snow animation (mine had 20)

CTRL+A

Open Snow Animation of choice

CTRL+A

CTRL+C

Click on top of tag back

CTRL+E, then click inside frame to place snow

PSP

Close all open layers

Open all closed layers

Copy Merged

AS
Paste As New Animation

CTRL+C

Be sure the "Propogate Paste" button is clicked in the AS toolbar

Click on tag back

Roll mouse ball to enlarge slightly (I find this makes it easier to paste the frame layer)

CTRL+E

Click in tag back to set frame layer (if you do not move the mouse, this layer will automatically be centered when you click CTRL+E)

View Animation

If happy, save!!

Monday, November 28, 2016

No Scraps Animated "Yin Yang"


Yin Yang


This tutorial was written by me on November 28, 2016 using my own ideas.

Any resemblance to others is coincidental and accidental.

This tutorial assumes you have a working knowledge of psp and is written in PSPX.


Supplies:

"Angel V Devil" tube by Robin Pushay - tube/license currently available at ADI


Filters:

Xero_Fritillary


Fonts:

Loki Cola


Abbreviations:

DS_Drop Shadow

ANL_Add New Layer

EC_Eye Candy

GG_Gradient Glow

AS_Animation Shop

C/P_Copy and Paste

FF_Flood Fill


Installing yin yang shape in PSPX:

Open shape in psp

Effects_Export_Shapes

Give your shape a name (I like to name it the original file name plus the creator if there's room)

Click OK

Now go to your Preset Shape Tool and find your shape


Open blank 600x600 canvas

PreSet Shape Tool_Yin Yang_Stroke 5 Black_Fill Null

Draw out a yin Yang shape almost as big as your canvas

Objects_Align In Center Of Canvas

Convert to raster

Magic Wand_Select inside the right shape area

ANL below shape

FF #77b6bb

C/P tube placing so face is inside selection

Selections_Invert_Delete_Select none

Blend Mode for tube layer_Luminance (L)

Opacity_40

Magic Wand_Select inside Left shape area

Highlight layer below shape

FF #851a2a

C/P tube placing so face is inside selection

Selections_Invert_Delete_Select none

Blend Mode for tube layer_Luminance (L)

Opacity_40

Highlight shape_DS_0_0_100_15_Black

Duplicate colored shape layer 3 times

Top Color Layer_Add Noise_Gaussian_33

Middle Color Layer_Add Noise_Gaussian 36

Bottom Color Layer_Add Noise_Gaussian 39

Close middle and bottom layers for now

Highlight original color layer

Adjust_Blur_Gaussian 15

Xero_Fritillary_5_30_10_20

Effects_Edge Effects_Enhance

Image_Mirror

C/P tube

DS_0_0_50_25_Black

Add Wording of choice

Add all correct copyright/license information

Name_Loki Cola_stroke 1 #77b6bb _fill Black

DS_2_5_50_5_Black


Animating:


Copy Merged

AS

Paste As A New Animation

PSP

Close top color noise layer

Open Middle color noise layer

Copy Merged

AS
Paste After Current Frame

PSP

Close middle color noise layer

Open bottom color noise layer

Copy Merged

AS
Paste After Current Frame

View Animation

If happy, save!

Sunday, April 5, 2015

Forum - "Spring"

Spring


This tutorial was written by me on April 04, 2015, using my own ideas. Any resemblance to others is coincidental and accidental. This tutorial assumes you have a working knowledge of psp and is written in PSPX6.
Please leave some love when downloading supplies. The artists/creators work hard to make/share their work with us, so let's be appreciative. Please use all correct copyright information and follow all TOU’s. Let’s give credit where credit is due.
As always, tutorials are only a guideline. If you don't have the exact supplies, use ones you have or ones you choose.


Supplies:
"Tiny Visitors" tube by Robin Pushay - tube/license currently available at ADI
Flower tubes/scrap elements of choice - I am using flowers and fence from PTU scrap kit "Summer Love" by Dezigns By Ali also currently available at ADI

Filters:
Mura's Meister_Copies_Wallpaper Rotate
Tramages_Tow the Line
Toadies_Weaver

Fonts:
Goddard Demo


Abbreviations:
EC = Eye Candy
GG = Gradient Glow
DS = Drop Shadow
C/P = Copy and Paste
FF = Flood Fill
ANL = Add New Layer
AS = Animation Shop


Open blank 600x250 image
C/P tube
Mura's Meister_Copies_Wallpaper Rotate_Default
Motion Blur_62_100
Edge Enhance

Duplicate twice
Bottom layer_ Toadies_Weaver_Default
Middle layer _ Blend Mode_Soft Light
Top layer_ Tramages_Tow The line_Default
Selection Tool_Select center area_delete
Select none
Only the 2 corners of the Tramages layer should be left
Duplicate
Highlight original Tramages layer_Effects_Distortion Effects_Wind_Right_100
Repeat Wind changing to Left
Noise_60

C/P flowers/fence
DS_each_0_0_100_10_Black

C/P tube placing on left
Duplicate
Highlight Original_Blur 15
Effects_Distortion Effects_Pixelate_10_10
Effects_Edge Effects_Enhance
Repeat Enhance
Move to left slightly
Move this layer below fence

Highlight copy tube layer
DS_0_0_65_35_black


ANL to top
FF_#fac71c
Select all_Contract 2_Delete_Select none
DS_0_0_100_10_Black twice

Add all correct copyright/license information

Name_ Goddard Demo_72_Black
Opacity 67

Save!!!


Monday, November 17, 2014

No Scraps - Love

Love


This tutorial was written by me on November 17, 2014, using my own ideas. Any resemblance to others is coincidental and accidental. This tutorial assumes you have a working knowledge of psp and is written in PSPX.
Please leave some love when downloading supplies. The artists/creators work hard to make/share their work with us, so let's be appreciative. Please use all correct copyright information and follow all TOU’s. Let’s give credit where credit is due.
As always, tutorials are only a guideline. If you don't have the exact supplies, use ones you have or ones you choose.


Supplies:

“Welcome To The Neighborhood” tube by Robin Pushay – tube/license available at ADI
Template 148 by Becky’s Creations

Filters:
Xero_Fritillary
Eye Candy 5_ Impact_Glass
Flaming Pear_Super Blade Pro_M_Coconutice

Brushes/Mask of choice

 Font_ Paintbrush


Abbreviations:
EC = Eye Candy
GG = Gradient Glow
DS = Drop Shadow
C/P = Copy and Paste
FF = Flood Fill
ANL = Add New Layer
D/D = Drag/Drop (Click on layer in main tag palette, hold left button down, drag to new canvas, release left button.)  


When working with templates, always Shift+D to duplicate, close original, then on each layer, select with magic wand (or Select All, Float, De-float), ANL, close/delete the original, do steps required in tutorial, select none


Delete credit layer and all shadow layers
Re-size to 600x450

ANL_apply brushes of choice_ #78a4af

Pink Rectangle_FF #b77da3
Xero_Fritillary_5_30_10_20
DS_0_0_100_15_Black

Black Rectangle_FF #afd066
Effects_Texture Effects_Blinds_4_50_#618b35_both boxes checked
DS_0_0_100_15_Black

Frame Fill_FF #c8eaf3
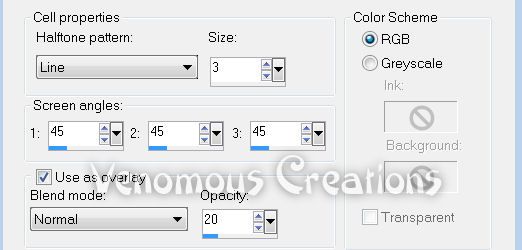
Effects_Artistic Effects_Halftone:


Shape Frame Background_FF #e2e29c
Adjust_Add Noise_Gaussian 35
DS_0_0_100_15_Black

Shape Frame_leave as is

Square Frame Fill_#72494f
C/P tube positioning inside frame_Invert_Delete_Select none
Blend Mode_Multiply

Square Frame White Background_Noise_55
DS_0_0_100_15_Black

Square Frame Black Background_Leave as is

Square Frame_ #b77da3

Heart Fill_ #f291de
EC 5_Impact_Glass_Clear no Drop Shadow_Default

Heart White Background_ FF #e2e29c
Adjust_Add Noise_Gaussian 35
DS_0_0_100_15_Black

Heart Black Background_Leave as is

Heart_FF #b1436f
Effects_Texture Effects_Weave_1_3_1_both boxes #f291de

Love White Background_FF #e2e29c
Adjust_Add Noise_Gaussian 35
DS_0_0_100_15_Black


Love Black Background_Leave as is

Love_ #f291de
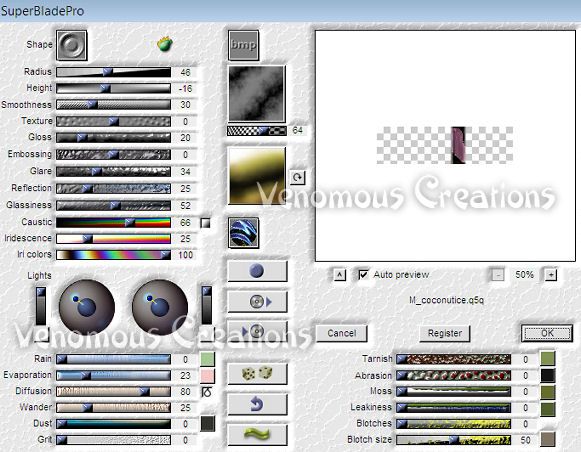
Flaming Pear_Super Blade Pro_M_Coconutice:


All You Need White Background_#e2e29c
Adjust_Add Noise_Gaussian 35
DS_0_0_100_15_Black

All You Need_Leave as is

Flower White Background_ #b1436f
Adjust_Add Noise_Gaussian 35
DS_0_0_100_15_Black

Flowers_FF #b1436f
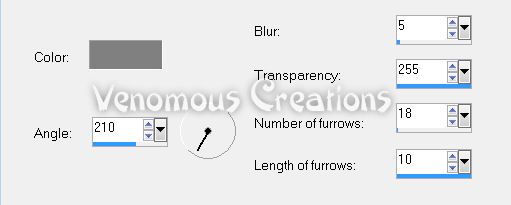
Effects_Texture Effects_Fine Leather:


C/P tube placing directly below Love White Background layer
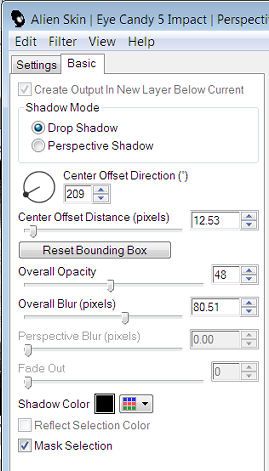
DS_0_0_65_35_Black

Crop to 600x450

Selection tool_select small amount of tube touching bottom of canvas
Selections_Modify_Feather_35
Hit delete a few times to soften the edge of tube
Select none

DS_0_0_100_15_Black

Add all correct copyright/license information

Name_ Paintbrush_72_Black
Duplicate
Convert copy to raster
Original text_Stroke 3_White
Noise_55
Repeat DS

Save!!

Wednesday, October 23, 2013

FTU - Chattin' With Santa


Chattin’ With Santa


This tutorial was written by me on October 23, 2013, using my own ideas. Any resemblance to others is coincidental and accidental. This tutorial assumes you have a working knowledge of psp and is written in PSPX.
Please leave some love when downloading supplies. The artists/creators work hard to make/share their work with us, so let's be appreciative. Please use all correct copyright/license information and follow all TOU’s. Let’s give credit where credit is due.
As always, tutorials are only a guideline. If you don't have the exact supplies, use ones you have or ones you choose.


Supplies:

“Santa and baby” tube by Robin Pushay – tube/license available at ADI
“Christmas Memories” FTU scrap kit by Creative Scraps
Big mask 019 by Vix
Fonts_Good Vibrations ROB and Classic AltCaps


Abbreviations:
EC = Eye Candy
GG = Gradient Glow
DS = Drop Shadow
C/P = Copy and Paste
FF = Flood Fill
ANL = Add New Layer
 AS = Animation Shop


Open blank 600x600 canvas

ANL_Select all_C/P paper 2 into selection_Select none
Apply mask

C/P the following elements, duplicating, mirroring, re-sizing as needed:

Bow 5
Fence
Flower Bough
Holly
Poinsettia
Present
Rocking Horse
Spill
Star
Street Light 2
Tree

DS all elements_0_0_55_35_Black

C/P tube
EC 5_Perspective Shadow:


Font_Good Vibrations ROB_72_Black
Type out “Happy Holiday”
Using the node, rotate slightly
Place directly above mask layer
DS_0_0_35_25_Black

Add all correct copyright/license information

Name_Classic AltCaps_100_#800000
EC 4000_GG_3_25_100_#758122
Sharpen
Repeat last DS

Save!!!!