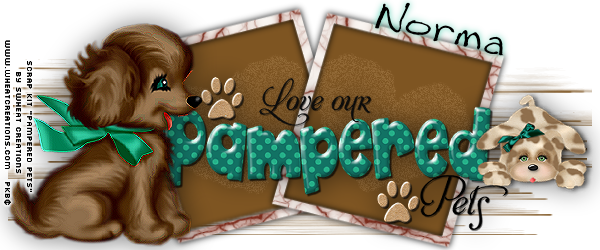
Showing posts with label Swheat Creations. Show all posts

Sunday, April 6, 2014

FTU Forum - Love Your Pets


Love Your Pets


This tutorial was written by me on April 05, 2014, using my own ideas. Any resemblance to others is coincidental and accidental. This tutorial assumes you have a working knowledge of psp and is written in PSPX.
Please leave some love when downloading supplies. The artists/creators work hard to make/share their work with us, so let's be appreciative. Please use all correct copyright/license information and follow all TOU’s. Let’s give credit where credit is due.
As always, tutorials are only a guideline. If you don't have the exact supplies, use ones you have or ones you choose.


Supplies:

“Pampered Pets” FTU scrap kit by Swheat Creations
Brushes of choice
Eye Candy 5_Textures_Marble
Font_Tall Paul


Abbreviations:
EC = Eye Candy
GG = Gradient Glow
DS = Drop Shadow
C/P = Copy and Paste
FF = Flood Fill
ANL = Add New Layer
AS = Animation Shop


Open blank 600x250 canvas

ANL_Apply lines brush #7e5522

C/P Word Art 4

Open DogNKittyFrame in psp
Using selection tool, select around the bottom left dog
C/P on working canvas as new layer
Close frame

DS dog and word art_0_0_40_35_Black

Rectangle Tool_width 10_any color_draw a suitable sized frame
Convert to raster
EC 5_Textures_Marble_Fractured-Rough

Free rotate Left 15

Magic Wand_select inside the frame
Modify_Expand 5
ANL below
FF #7e5522
ANL
Apply a heart brush_#38c7a5_Blend mode Luminance(L)_Opacity 24_Noise 50
DS frame_0_0_100_10_Black
Merge frame, heart, and background together

Duplicate
Mirror

Add all correct copyright/license information

Name_Tall Paul_72_Black
Free rotate_Right 15
Place as shown
DS_0_0_100_10_#38c7a5

Save!!!


Sunday, September 15, 2013

PTU - Fab 50’s Facebook Timeline/Forum Set


Fab 50’s Facebook Timeline/Forum Set


This tutorial was written by me on September 15, 2013, using my own ideas. Any resemblance to others is coincidental and accidental. This tutorial assumes you have a working knowledge of psp and is written in PSPX.
Please leave some love when downloading supplies. The artists/creators work hard to make/share their work with us, so let's be appreciative. Please use all correct copyright information and follow all TOU’s. Let’s give credit where credit is due.
As always, tutorials are only a guideline. If you don't have the exact supplies, use ones you have or ones you choose.


Supplies:

“Rock around The Clock” PTU scrap kit by Swheat Creations
Eye Candy 5_Impact_Perspective Shadow
Font_ Fabulous 50s


Abbreviations:
EC = Eye Candy
GG = Gradient Glow
DS = Drop Shadow
C/P = Copy and Paste
FF = Flood Fill
ANL = Add New Layer
AS = Animation Shop


Facebook Timeline:

Open blank 850x320 blank canvas

ANL_Select all_C/P Bkg13 into selection
ANL_C/P Bkg6 into selection_Select none

Custom selection:


Delete_Select none

ANL_Custom Selection:


FF Black_Select none
This is the area your Facebook avatar will be, so be sure it is left empty on your timeline or anything you place here will be covered by the avatar.

C/P the following elements:

56 Chevy
Diner – Duplicate_on original_Toadies_What Are You_Default_Blend Mode Luminance(L)_Opacity 50
Diner Sign
Fifi
Musical 1
Skates 2

DS each element:
EC5_Impact_Perspective Shadow:


IMPORTANT: Close/delete the black square we made earlier. It was just a guideline and is no longer needed.

Add all correct copyright/license information

Name_ Fabulous 50s_72_Black

ANL to top of palette
FF Black_Select all_Contract 2_Delete_Select none
Save!!!

Forum Sig:

Open blank 600x300 canvas
Repeat above steps, re-sizing to fit nicely on canvas
Add any copyright/license information
Save!!


Forum Avatar:

Open blank 150x150 canvas
C/P background, Diner Sign, Skates, Checkered frame, Musical Notes_re-sizing as needed
Type first letter of name_size 85_Black_Convert to raster
Type remainder of name_size 36_Black_Convert to raster_place slightly higher than the bottom of first letter_Merge with first letter layer
DS
DS same as for timeline
Add any copyright/license information
Save!!

Wednesday, July 10, 2013

PTU - Ragdoll Forum Set

Ragdoll


This tutorial was written by me on July 10, 2013, using my own ideas. Any resemblance to others is coincidental and accidental. This tutorial assumes you have a working knowledge of psp and is written in PSPX.
Please leave some love when downloading supplies. The artists/creators work hard to make/share their work with us, so let's be appreciative. Please use all correct copyright/license information and follow all TOU’s. Let’s give credit where credit is due.
As always, tutorials are only a guideline. If you don't have the exact supplies, use ones you have or ones you choose.


Supplies:

“Ann N Andy” PTU scrap kit by Swheat Creations
Tramages_Tow the Line
Font_Century


Abbreviations:
EC = Eye Candy
GG = Gradient Glow
DS = Drop Shadow
C/P = Copy and Paste
FF = Flood Fill
ANL = Add New Layer
AS = Animation Shop


This is a quick, easy tut. :)

Open blank 600x250 canvas

C/P one of the double frames as new layer
Rotate Left 90 degrees
Resize so it fits nicely in center of canvas

Select inside of left frame_Expand by 5
C/P “Angels R Watching” below frame
Re-size and position so parts you like are showing in frame (I rotated mine slightly to match angle of frame)
Invert_Delete_Select none

Repeat for right frame using “Angel On Duty”

Duplicate Frame_Move to bottom of tag
Gaussian Blur_15
Tramages_Low the Line_Default
Duplicate

C/P Annie Flower_re-size and place on bottom right corner of frame

C/P Button5_Re-size and place on the left bottom corner of frame

C/P Button1_Re-size and place over circle brads at one end of frame
Duplicte_Mirror

Sharpen all layers once

DS all layers_0_0_75_15_Black

Add all correct copyright/license information

Name_Century_50_stroke 1 Black_fill #c00000
DS_2_5_50_5_Black

Save!!


Avatar:

Open blank 150x150 canvas

Type first letter of name using same settings as before, changing size to 125

Repeat DS

Add the heart button and flower, placing as shown

DS as on the tag

Save!!!

Sunday, July 7, 2013

PTU - Picnic Fun

Picnic Fun


This tutorial was written by me on July 06, 2013, using my own ideas. Any resemblance to others is coincidental and accidental. This tutorial assumes you have a working knowledge of psp and is written in PSPX.
Please leave some love when downloading supplies. The artists/creators work hard to make/share their work with us, so let's be appreciative. Please use all correct copyright/license information and follow all TOU’s. Let’s give credit where credit is due.
As always, tutorials are only a guideline. If you don't have the exact supplies, use ones you have or ones you choose.


Supplies:

“Blossom” tube by Cecil Paplinskie – tube/license available at ADI
“Picnic” PTU scrap kit by Swheat Creations
Mask of choice
Blade Of Grass picture tube
Font_YellowSubmarine


Abbreviations:
EC = Eye Candy
GG = Gradient Glow
DS = Drop Shadow
C/P = Copy and Paste
FF = Flood Fill
ANL = Add New Layer
AS = Animation Shop


This kit has element sets in different colors...Black, Yellow, Green, Red, Purple...You choose which color palette you like to use in your tag. :)

Open blank 600x600 canvas

ANL_FF #68b0c5
Apply mask

C/P one of the BKG papers as a new layer
Resize 85% several times
Rotate_Left_30

Using the color of choice, C/P the following elements, duplicating, mirroring, placing as shown:

Ant_duplicate and rotate different directions placing in random places around tag
BBQ Pit
Fun Times Word Art
Hot Dog
Mustard
Ketchup
Picnic Basket
Watermelon
Sun

Using picture tube tool, add a few sprigs of grass together in a small bunch
Duplicate and place around tag

C/P tube

Add all correct copyright/license information

Add name_Yellow Submarine_125_stroke 1 color to match tag_fill Black

DS all layers_7_-5_50_13_Black (adjust settings depending on where you place your sun_

Save!!


Friday, May 17, 2013

FB Header - Monkey Business

Monkey Business Facebook Header


This tutorial was written by me on May 17, 2013, using my own ideas. Any resemblance to others is coincidental and accidental. This tutorial assumes you have a working knowledge of psp and is written in PSPX.
Please leave some love when downloading supplies. The artists/creators work hard to make/share their work with us, so let's be appreciative. Please use all correct copyright information and follow all TOU’s. Let’s give credit where credit is due.
As always, tutorials are only a guideline. If you don't have the exact supplies, use ones you have or ones you choose.


Supplies:

“Monkey Crate” PTU scrap kit by Norma of Swheat Creations 
(this is an older kit of Norma's and you will have to join her "Krafty Kreations" site to have access to it)
Eye Candy 4000_Gradient Glow
Font_Påsättning


Abbreviations:
EC = Eye Candy
GG = Gradient Glow
DS = Drop Shadow
C/P = Copy and Paste
FF = Flood Fill
ANL = Add New Layer
AS = Animation Shop


Open blank 800x320 canvas
ANL_Duplicate 4times (5 blank layers total)
Select all
Starting at bottom:
Layer 1: FF #e6d1b9
Layer 2: C/P paper 1 into selection
Layer 3: paper 3
Layer 4: paper 2
Layer 5: paper 1

Keep selected

With top layer highlighted_Contract by 10_Delete
Highlight next layer down (yellow)_Contract by 10_Delete
Highlight next layer down (green)_Contract by 2_Delete
Select none

Change blend mode of layer 2 (first brown paper layer) to Multiply
Layer 1 (FF layer)_Effects_Texture Effects_Weave_1_5_2_Both boxes set to #492110


Add any elements you wish, re-sizing, duplicating, mirroring, and placing as desired.

Remember to leave a blank area on the bottom left corner for your FB avatar

I used these in my header:

Banana – rotate left 90 and place under the paws of the monkey on tree branch
Banana Bunch
Libs Monkey
Monkey Full Tail No Tree
Monkey with hook tail
Monkey Crate
Monkey Head N Arms
Sunflower

Place monkeys so it looks like they are hanging on frame

Font_Påsättning_72_Black
Type out saying/name
EC 4000_GG_3_25_100_#f0d832
Place Monkey Head on top of saying to look like he’s laying on the words

DS Frame layers_0_0_100_10_Black (repeat DS on green frame a couple times)
DS all other layers_0_0_63_34_Black

Add all correct copyright/license information placing so FB does not cut it off when placed on page

Save!!

Wednesday, July 18, 2012

PTU - Monkeyin' Around

Monkeyin’ Around


This tutorial was written by me on July 18, 2012, using my own ideas. Any resemblance to others is coincidental and accidental. This tutorial assumes you have a working knowledge of psp and is written in PSPX.
Please leave some love when downloading supplies. The artists/creators work hard to make/share their work with us, so let's be appreciative. Please use all correct copyright information and follow all TOU’s. Let’s give credit where credit is due.
As always, tutorials are only a guideline. If you don't have the exact supplies, use ones you have or ones you choose.


Supplies:

PunUpToons_149 tube by PinUpToons available at CDO
“Monkey Crate” PTU scrap kit by Swheat Creations
“Monkeyin’ Around” word art
Eye Candy 4000 – Gradient Glow

 
click image then save as


Abbreviations:
EC = Eye Candy
GG = Gradient Glow
DS = Drop Shadow
C/P = Copy and Paste
FF = Flood Fill


Open 600x600 blank image
Add new layer
C/P Bkg 6 into selection
Select none
Apply mask
C/P Ring 1
Select inside circle
Add new layer below frame
C/P Bkg2 into selection
Select none
C/P Sunflower – Duplicate – re-size – mirror – duplicate – resize
Arrange as shown
DS each_0_0_100_10_Black
Merge sunflowers together
Duplicate – mirror
Position on right side of tag
C/P tube and position
C/P Loops2 – place behind tube – erase parts showing on left of tube
C/P LibsMonkey – resize - place on yellow circle layer
Reduce opacity to 30
C/P the following elements and place as shown, erasing parts of monkey tails so it looks like they are hanging from the other elements:
Ladybug1
Monkey Full Tail no tree
Monkey with hook tail
Monkey Crate
Pearl2
Bow6
Banana Bunch
DS all layers_0_0_100_10_Black
C/P word art
EC 4000 – GG_3_25_100_#f6e271
DS_2_-5_50_5_Black
Add all correct copyright/license information
Add name_Ulbricht_72_Stroke 2­ #f6e271_Fill Black
Position behind tube as shown
DS_0_0_100_10_Black
C/P Monkey head and arms element
Re-size and place on name as shown
Repeat DS
Save and enjoy!!!


Wednesday, July 11, 2012

PTU - Coffee


Coffee


This tutorial was written by me on July 11, 2012, using my own ideas. Any resemblance to others is coincidental and accidental. This tutorial assumes you have a working knowledge of psp and is written in PSPX.
Please leave some love when downloading supplies. The artists/creators work hard to make/share their work with us, so let's be appreciative. Please use all correct copyright information and follow all TOU’s. Let’s give credit where credit is due.
As always, tutorials are only a guideline. If you don't have the exact supplies, use ones you have or ones you choose.


Supplies:

“Coffee Break” tube by Gabi Spree available at ART
“Morning Brew” PTU scrap kit by Swheat Creations
Mask 516 by Insatiable Dreams
Eye Candy 4000 – Gradient Glow
Font of choice – I used A&S Porkchop Primitive


Abbreviations:
EC = Eye Candy
GG = Gradient Glow
DS = Drop Shadow
C/P = Copy and Paste
FF = Flood Fill


Open 600x600 blank image
Add new layer
Select all – C/P Destiny 11 into selection
Select none
Apply Mask
Add noise_34
C/P tube
C/P the following elements, resizing, mirroring, and placing as desired:
Coffee Can 2
Coffee Cup
Coffee Sign 1, 3, 4, and 5 – rotating as shown
Frame Flowers
Glitter Splatter 4
Morning Sun
Straw
DS all layers_0_0_100_10_Black
Add all correct copyright/license information
Add name_ A&S Porkchop Primitive_72_Black
EC 4000 – GG_3_25_100_ #e4890b
DS_2_-5_50_5_Black
Save and enjoy!!!

Friday, June 22, 2012

PTU - Wild Thang


Wild Thang


This tutorial was written by me on June 22, 2012, using my own ideas. Any resemblance to others is coincidental and accidental. This tutorial assumes you have a working knowledge of psp and is written in PSPX.
Please leave some love when downloading supplies. The artists/creators work hard to make/share their work with us, so let's be appreciative. Please use all correct copyright information and follow all TOU’s. Let’s give credit where credit is due.
As always, tutorials are only a guideline. If you don't have the exact supplies, use ones you have or ones you choose.


Supplies:

“Mistress Of Cheetah” tube by Gabi Spree available at Artistic Reality Talent
“Drive Me Wild” scrap kit by Swheat Creations
Mask of choice – I used Becky_Mask009
Font of choice – Jellyka Castle’s Queen
Eye Candy 4000 – Gradient Glow


Abbreviations:
GG = Gradient Glow
DS = Drop Shadow
C/P = Copy and Paste
FF = Flood Fill


Open blank 600x600 image
Add a new layer
Select all
C/P WildBkg10 into selection
Select none
Open mask in psp
Layers - New mask layer – From Image - choose your mask
Merge Group
C/P Ring as new layer
Magic wand – click inside ring
Selections – Modify – Expand by 16
C/P LepPrint2 as new layer
Position below ring with parts you want showing thru ring
Promote selection to layer
Select none
Delete original LepPrint2
C/P tube
C/P the following elements, resizing, and placing to your liking:
Grass1
Flower1
Flower2
Fern3
Bow2
WildText2
DS tube and elements_0_0_100_10_Black
Add all correct copyright/license information
Add name – Jellyka Castle’s Queen_100_Black_Stroke 1_#894733
Convert to raster
EC 4000 – GG_3_25_100_White
DS_2_-5_50_5_Black
Save and enjoy!!