
Beach Babe
This tutorial was
written by me on May 16, 2012,
using my own ideas. Any resemblance to others is coincidental and accidental.
This tutorial assumes you have a working knowledge of psp and is written in
PSPX.
Please leave some
love when downloading supplies. The artists/creators work hard to make/share
their work with us, so let's be appreciative. Please use all correct copyright
information and follow all TOU’s. Let’s give credit where credit is due.
As always, tutorials
are only a guideline. If you don't have the exact supplies, use ones you have
or ones you choose.
Supplies:
Tube of choice – This
tube is by the awesome Suzanne Richards and was purchased at CDO
Mask of choice – I
used Becky_Mask023
Font of choice – This
one is “Realvirtue Regular”
Eye Candy 4000 –
Gradient Glow
Sand tube that comes
in PSP
C/P = copy/paste
DS = drop shadow – my
settings were: 7_3_50_5_Black
Resize and sharpen
each layer as needed
Paste each item as a
new layer so we can move it around easier
Open new blank image
in psp 650x600
Add new layer – flood
fill with color of choice – this will be the sky
Layers - New Mask
Layer - From Image - select your mask from the dropdown list – Apply
Right click mask
layer in palette – Merge _Merge Group
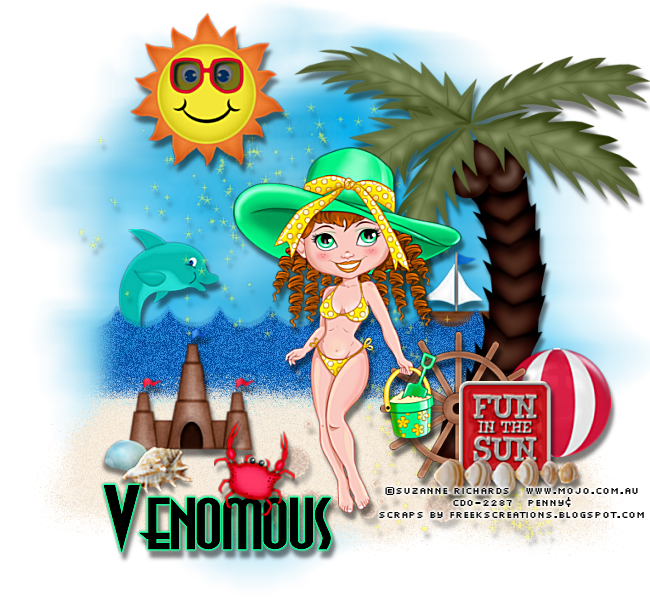
C/P the wave element
and place towards the bottom of sky
Adjust – Add/Remove
Noise – Add Noise_ 36_Uniform_Monochrome Checked
Grab your selection
tool - select the end edges of the waves – Selections – Modify –Feather_34_OK
Now hit delete until
it softens the way you want
Add a new layer above
the waves
Using the picture
tube tool, select the sand tube – left click and drag across bottom edge of
waves to make the beach, adding as much or as little sand as you like
C/P the Dolphin and
place him behind the waves so it looks like he’s jumping from them
C/P the boat behind
the waves also
C/P remaining elements from the
kit, placing on the tag to your liking
Add a DS to all
layers
Add all copyright
information – I like to add a gradient glow to my copyrights so they stand out
against the backgrounds better
Add your name in font
of choice – I used “Realvirtue Regular”_72_Black then stretched it out a bit
using the nodes
Convert to Raster
Eye Candy
4000_Gradient Glow_3_25_100_ Color to match tube (#02c56a taken from the girl’s
hat)
DS as before
That’s it!! Thanks
for trying my tut!!
No comments:
Post a Comment